Woodhall Spa Art Quilt…..

My latest art quilt has been made in response to a challenge set by the Cranwell Contemporary Stitch group. The challenge was set in January and the theme was “what Winter means to me”. Being a new member meant I didn’t have much time to lose as the deadline for handing in the finished work was going to be the second week in April.

Since signing up for the David Hockney Challenge last year I have become very interested in depicting trees in my work and all through the Winter I have been noticing trees like I have never done before. With this in mind I knew immediately that I wanted to create another tree themed quilt so took my camera on a walk through the woods in Woodhall Spa. This is a beautiful spot and I came home with dozens of images which will provide me with inspiration for a long time to come!

IMG_1642

IMG_1625

IMG_1731
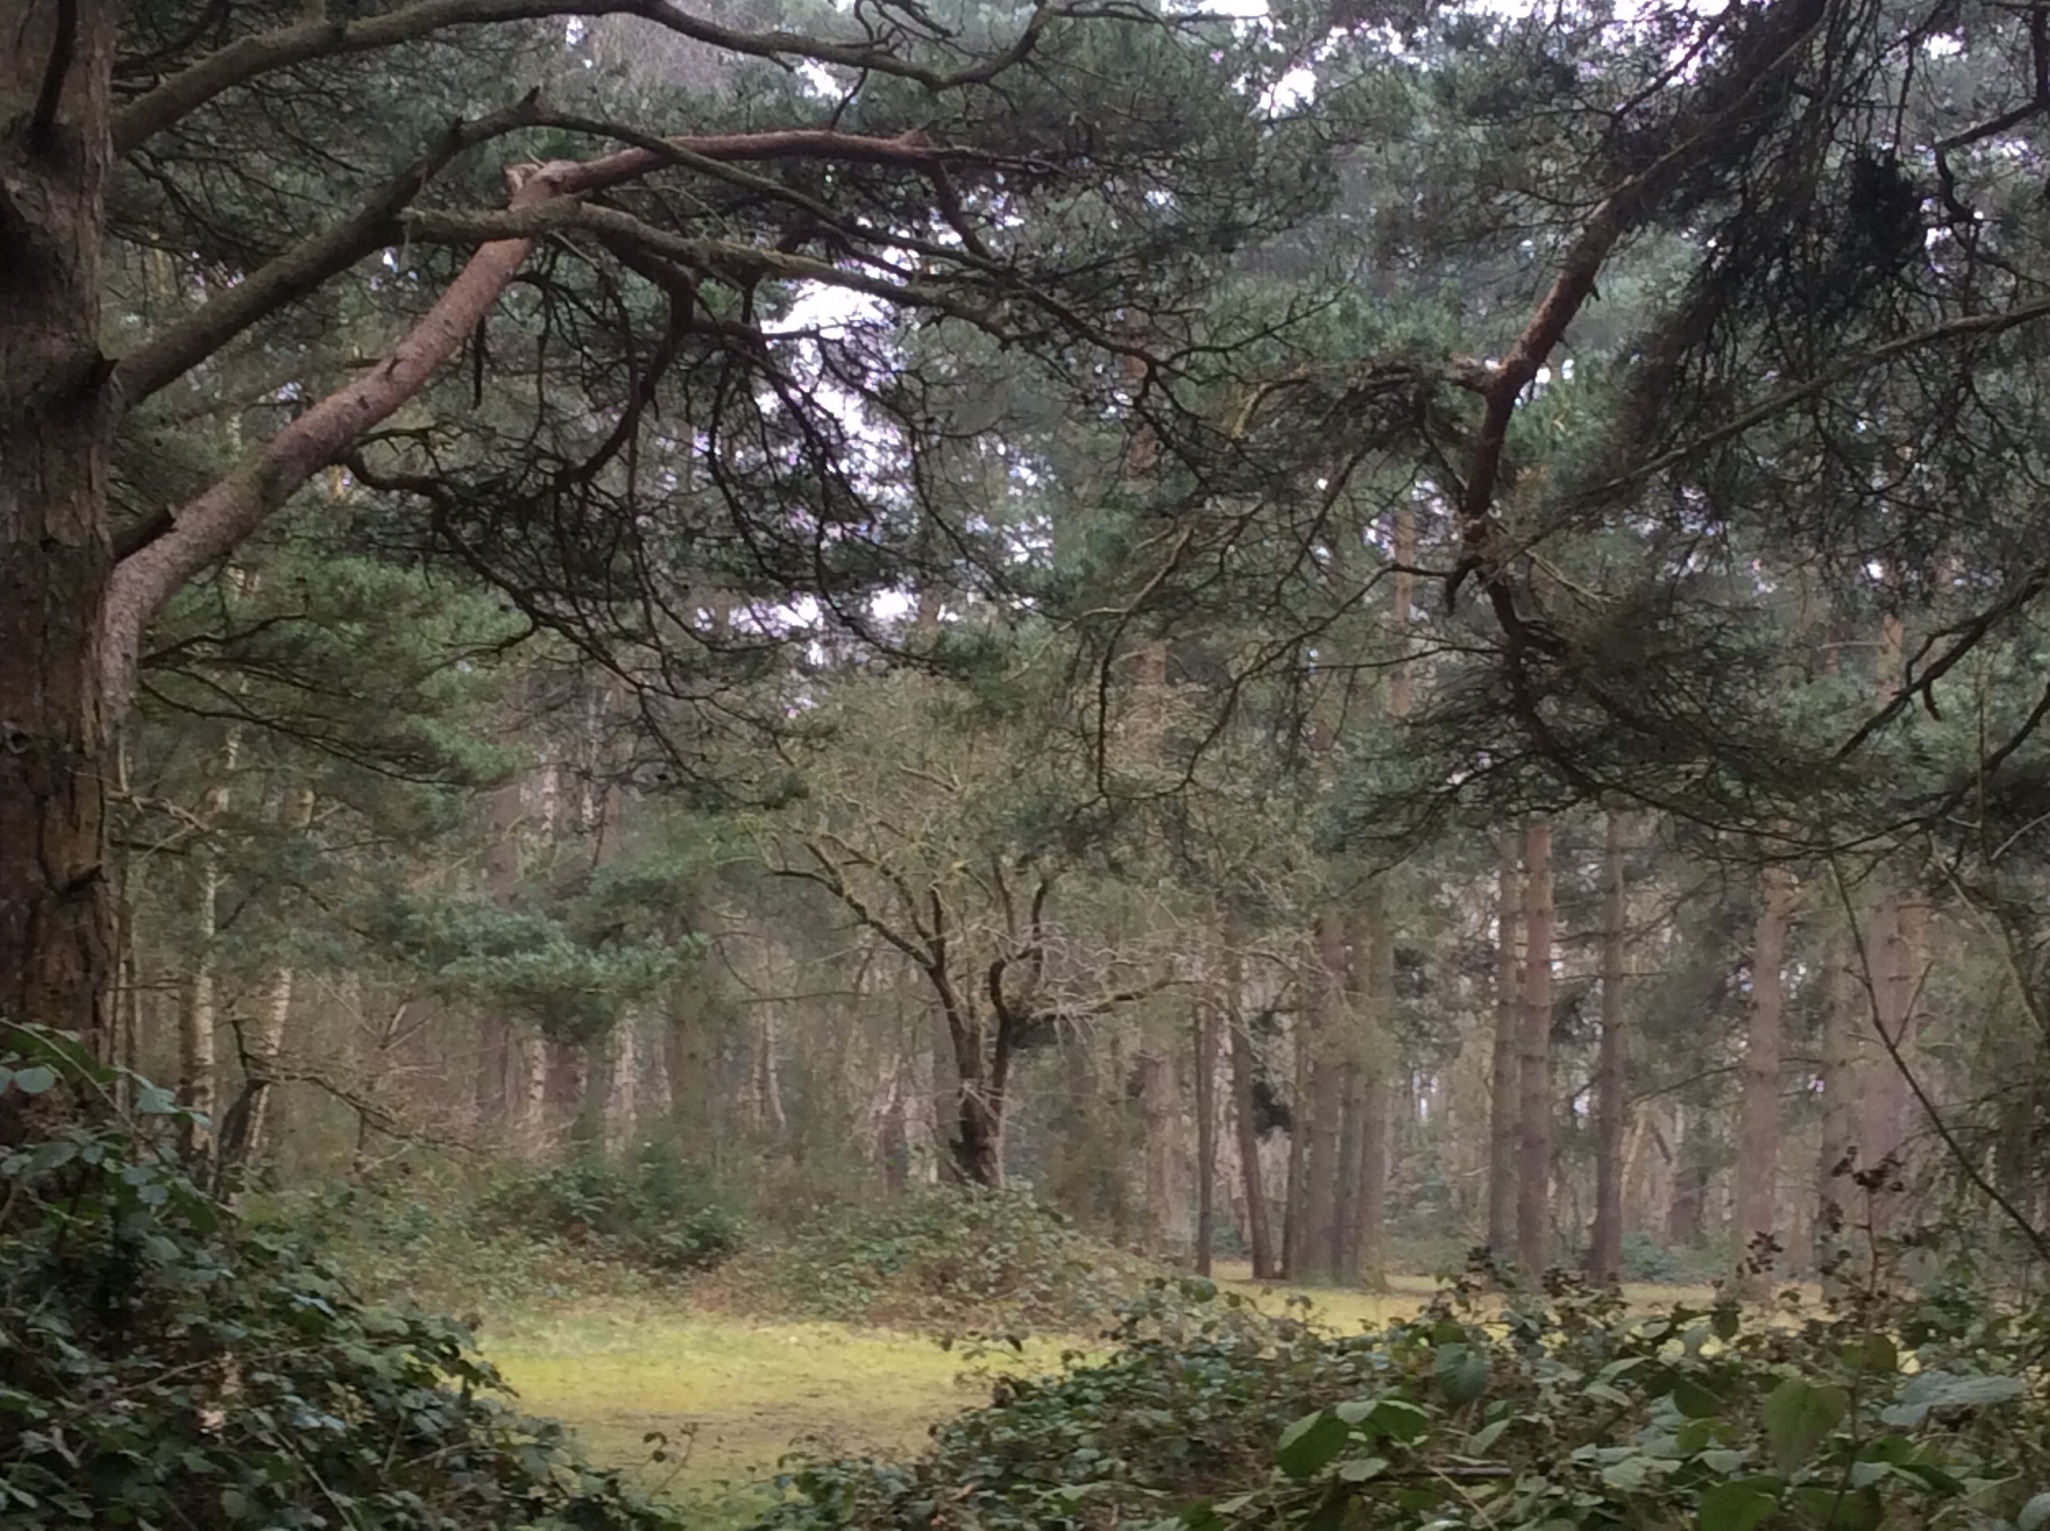
The image I chose to work with is the one shown below.

IMG_1720
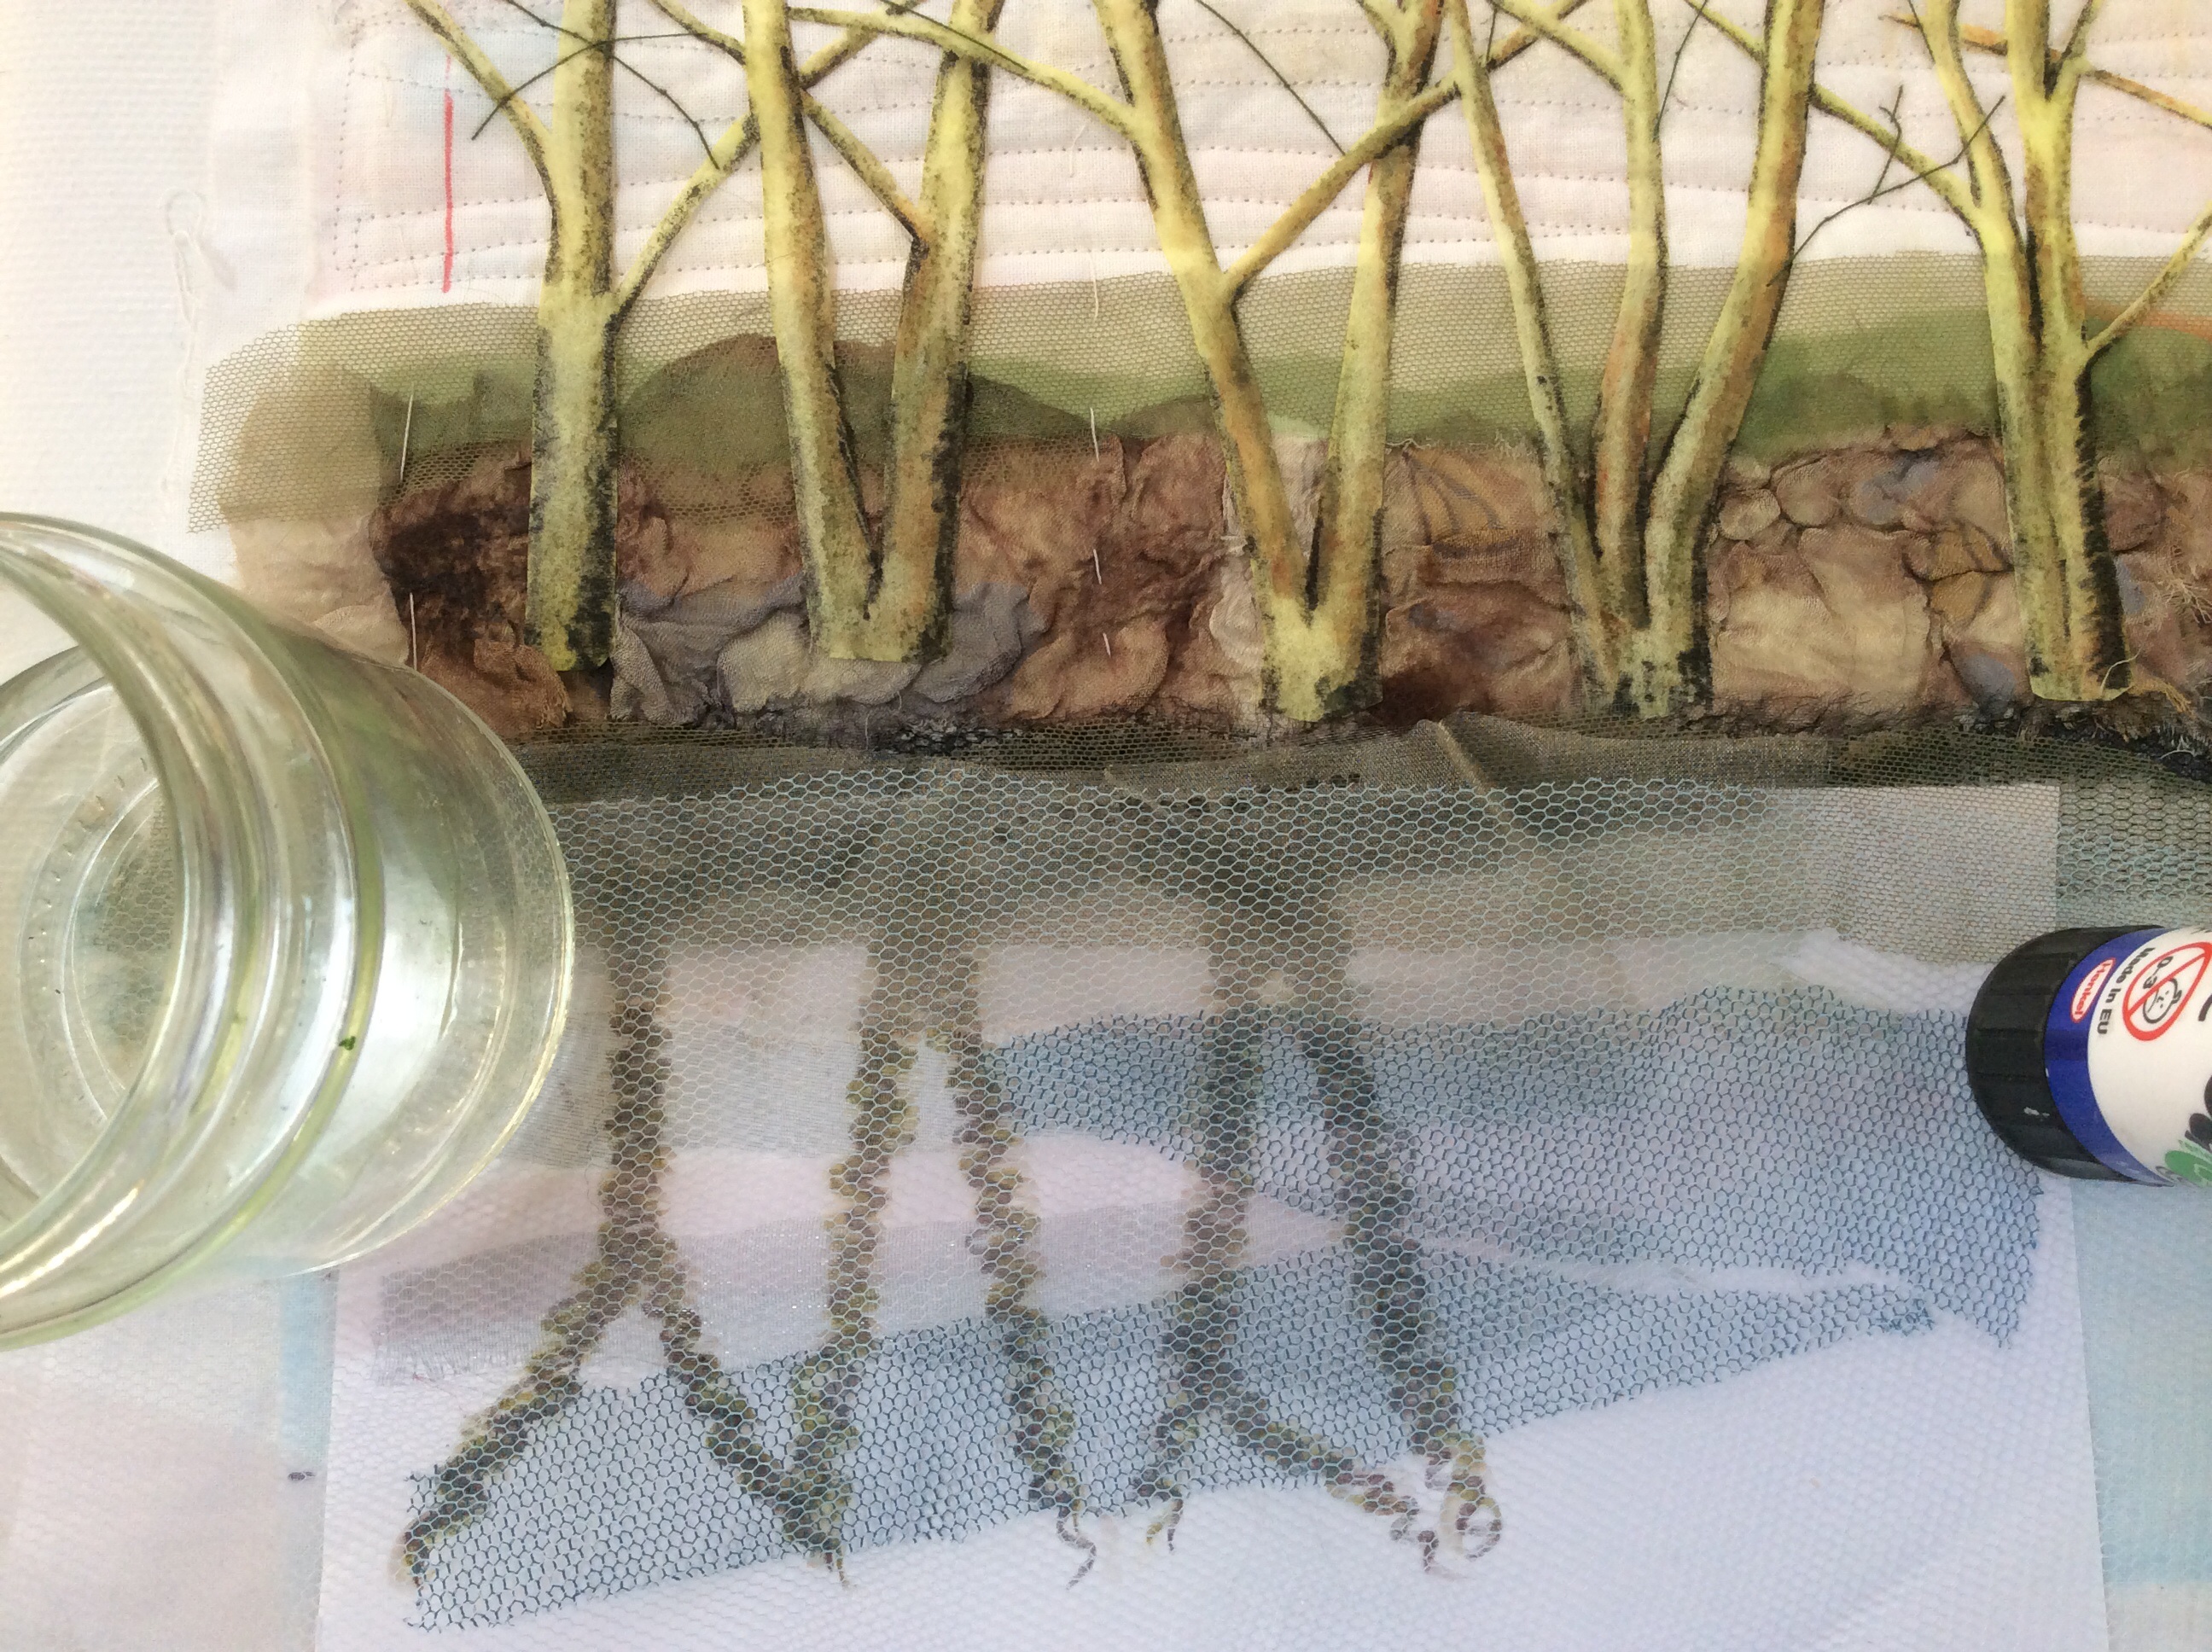
I began by painting a very pale grey sky and a grey/green backdrop for the woodland using Procion dyes. I bought a starter kit of Procion dyes when I visited Artvango and this was my first attempt at working with them.

IMG_1721
The next step was to machine sew the background trees in shades of green and cream thread. I then added torn strips of green sheer fabric and a little black netting to create shadows. Silver embroidery thread was hand stitched to make the tall thin silver trees in the mid-ground.

IMG_1778
At this stage I machined the thin branches of the trees, added grey sheer fabric in patches over the top and held it in place with a criss-cross of hand stitches branches.

The woodland floor is hand stitched silver thread over dyed muslin which has been roughly cut and layered with small snippets of gold organza.

The three main tree trunks were formed from iron-on Vilene which was coloured with Procion and bark detail was added using Inktense pencils.

The finished piece measures 15″ x 20″ and unlike my last “tree” quilt, which was done with free machine stitching, all of the machine work on this one was done with the feed dogs up using a walking foot.

IMG_1777

David Hockney In Stitches…..

Yesterday afternoon saw the 3rd meeting of LINQS, the Lincolnshire Quilters group, which was formed last year with the aim of creating “inspired” quilts to form the basis of a travelling exhibition.  Our first “inspirational” theme is the work of David Hockney. The brief is to take influence from his work however you want to do it, whether that be colour, shape, subject matter, etc. it’s up to the individual.  Gill set herself the task of reproducing, as accurately as possible, a specific Hockney painting using textiles, threads, beads and found materials.  The finished quilt is shown below with a photo of Hockney’s 18th VN painting.  Isn’t it beautiful?

Click here for more photos and info about LINQS.


Kantha Workshop…..

Today I joined a lovely group of ladies in Cranwell Village Hall to learn the basics of Kantha stitching.  Our tutor,  Gilli Theokritoff, is an active member of Region 10 of the Quilters Guild, running workshops both locally and around the country.  Gilli brought along several beautiful examples of her Kantha work and provided the group with a choice of designs and threads to work with during the day.

Kantha is a simple embroidery technique consisting of running stitch often worked in parallel lines and in various directions.  The photo below shows two beautiful examples of Gilli’s Kantha work using her “Little Bird” design.

image

I am sure I speak for everyone when I say what a great day we had and you can see from the following images the variety of designs and colours that were worked on during the day.

image

image

image

image

image

Hand dyed and stamped blue fabrics with assorted threads, selected for the Kantha workshop at Cranwell Village Hall.

image

image

image


Artvango & The Finished Vessel…..

Last weekend a friend and I drove down to Knebworth to see the “Artists in Residence” at Artvango.  It was my first visit and turned out to be a really worthwhile day.  The three textile artists demonstrating their skills were Clare Bullock (Feltmaker), Sharon Osbourne (Mixed Media) and Lynda Monk (Thermofax).  Not only was it interesting to watch these artists at work but it was wonderful how they were so enthusiastic to share their advice and tips so freely.

While I was there I had my grey/lemon vessel in mind and within the first two minutes of arriving Clare had given me the answer to a problem I was having using synthetic organza with Merino tops.  I wanted to include the organza as a another texture but I’d found that my fibres were not migrating through the fabric enough to bond the two together.  Clare explained that using a very thin layer of fibres and rubbing, not rolling, was the best way to approach it, and it worked.  Thanks for that Clare.

In another part of the studio Lynda Monk was demonstrating her use of Thermofax screens and expanding foam on leaf and hexagon shapes cut from Lutradur.  What I found interesting was the fact that the wire she was using to give the leaves their shape wasn’t silver or copper coloured like I had in my workroom, Lynda’s wire was covered with white cotton.  She explained that she uses this so it can be died to match whatever she is making.  Call me sad but I hadn’t seen this stuff before and I was so excited I had to buy some!  That was vessel problem two sorted.  How to hide the wire?  Colour it grey and lemon.

Opposite Lynda was Sharon Osbourne with the most wonderful collection of mixed media work on dispay.  Sharon was demonstrating the use of wax crayons with rubbing plates to create patterns on fabric, the crayon is then sealed with a medium.  I was standing next to another lady who, like me, works with LD students and we both agreed that having spoken to Sharon we were coming away with several ideas that we could use in future workshops.  A couple of days later I tried the wax crayon technique at one of the care homes where I do craft sessions with LD adults and they loved it!

Anyway, back to the 3d piece.  It’s now finished, compete with coloured wire, organza and felting.  I decided that using all 3 panels would result in a vessel too large for the space I wanted to put it so I only used two of them.  Once the machine stitching was finished the holes were burnt out using a soldering iron and hand stitching was added across the larger openings.  The cotton covered wire was coloured to match the panels and sewn in place using zigzag stitching.  I’m really happy with how this has turned out and it’s something I would definitely like to do more of, particularly incorporating felting into my work and continuing with a more abstract theme.

Finished vessel with the felted bowl which, along with the Flower Tower, provided the initial inspiration.


Detail showing the silver coloured organza.


Close up showing the burnt out sections which have been decorated with hand sewn threads.


Another 3d vessel…..

Since finishing my Flower Tower (and wondering what on earth I am going to do with it) I’ve been thinking about making another 3d vessel.  If it’s a success it will be destined for the lounge to sit next to a felted bowl I made last year with Jenny Pepper.  I love the grey and lemon colour scheme of the bowl and so I began by wet felting some fibres to match it.

My starting point for the grey/lemon vessel.

My starting point for the grey/lemon vessel.

I didn’t have a shape in mind but they turned out a bit like grey bacon rashers!  I repeated the exercise, this time laying out three lots of very fine fibres and covering each of them with a strip of white organza.  If you click on the photo below to enlarge it you will see the organza more clearly.

The painted Lutradur and pieces of felt ready to be sewn.

The painted Lutradur and pieces of felt ready to be sewn.

The next step was to roughly cut 3 pieces of Lutradur and paint it with Inktense Blocks.  I say “roughly” because I want the finished effect to look organic and distressed so I’m not working to a precise measurement or shape.

The FM embroidery is work in progress.

The FM embroidery is work in progress.

I have several threads of dubious quality (I haven’t a clue what some of them are made of) so I spent a bit of time last night blasting them with my heat gun to confirm which are 100% cotton, as opposed to polyester, and which are Rayon, as opposed to Nylon.  That job done, it was time to start machining with cream, grey, gold and dark olive.   It needs a lot more stitching yet but I will put this piece to one side for now and work on the other two sections.


Flower Tower…..

A couple of weeks back I was invited to attend a “Flower Tower” workshop which was being held at the Cranwell Contemporary Stitch Group. Before the workshop I was shown an example of what we would be making, the 3d tower was made from painted Vilene and covered with scraps of fabric which were machine stitched in place. The whole vessel was then embellished with beads and flowers made using a variety of techniques.

I liked the basic shape of the tower and the idea of painting onto Vilene and immediately thought that I would like to paint and embellish mine as a “scene”, rather than as an abstract. I have based my design on the velvet piece I did a couple of months ago, using some of the same stamps and threads. The tower has a wire frame which was couched on using zigzag machine stitch and it stands on tiny felted feet.

In my hurry to get finished I forgot to paint the lining fabric! As the vessel is hollow, and there’s no way I can add colour past the “curls”, I’m thinking of just sponging the tips blue and adding a felted “stopper” so you don’t see any further down into the tower. Once it’s done I will post an update and after the next meeting will add photos of the towers made by the other Cranwell ladies.

IMG_1464-0

IMG_1466

IMG_1460

IMG_1462

IMG_1461

Designing with Fractals…..

Royal Crustacean by Rose Rushbrooke.

Royal Crustacean by Rose Rushbrooke.

I recently came across this photograph of a beautiful art quilt by Rose Rushbrooke which has been based on a “fractal” design. Not knowing what that meant I googled it and discovered a whole new world of amazing images created using “Fractal” apps. I won’t attempt to explain the mathematics behind this process, there are lots of websites that explain it better than I ever could, but I did download a free app and after a few minutes of playing with it I came up with the following designs. The app I used is Fractile Plus, it’s simple to use and quite addictive. I don’t know if I will get around to doing anything with any of these but it they were fun to create and have the potential for inspiring future textile designs.

IMG_0753

My first attempt with the Fractile Plus App.


IMG_0754

IMG_0775

IMG_0780

IMG_0760

The Finished Quilt…..

My Riverside Trees art quilt is now finished and just needs to be edged.  This 30cm x 40cm quilt was done as trial ahead of making a larger version at 30″ x 40″ for the David Hockney Challenge.  It’s just as well I had the dummy run as there are a few things I have learnt while doing this project.

Firstly, I must start using a sketchbook…..I tend to launch straight into something and make it up as I go along.  The sky would have been different, and I would have been happier with it, if I had planned it before I started.

Secondly, I naively thought that using iron-on Vilene would mean I didn’t have to sew the trees in place…….yeah, right!   The more I handled the quilt the looser the trees became so they all had to stitched down.  This leads me on to the third thing I learnt which is “remember to breath” while free machine stitching!

The fourth thing I found was that organza and net, although looking very effective when layered, can also be problematic as loose fibres sometimes migrate between the layers and are very fiddly to remove.   My fabrics were simply laid in place, pinned and stitched, I’m guessing that if I had ironed them onto Bondaweb before stitching I could have avoided this happening.

The finished quilt

The finished quilt


Riverside Trees…..

Riverbank Trees Quilt

I’ve finished sewing the smaller branches and twigs onto my David Hockney inspired quilt and have been giving some thought to the reflections on the water.  The simplest way would be to create a mirror image of the riverbank, but my original photograph didn’t show the trees like that.  The tree trunks were distorted by the ripples on the water, which I am finding harder to replicate.

I’ve tried roughly sketching a few wiggly tree trunks onto paper and layering them with organza and netting.  The intention is to draw directly onto the top fabric and cover this with strips of sheers. If it’s a failure, which I half expect it to be, it won’t matter as I’ve left the wadding and backing loose at the bottom in case I need to patch it in with a second attempt.

Riverside Trees

Hockney self portrait update…..

Thanks to Maggy for pointing out that I hadn’t posted a picture on here of my finished quilted version on Hockney’s self-portrait.   I have just added it to “Hockney gets a scarf” under the “Art Quilts” category.

If anyone reading this is interested to learn more about the Lincolnshire Quilters “David Hockney Challenge”‘, which is gaining momentum nicely, we have a blog at http://www.linqsblog.wordpress.com